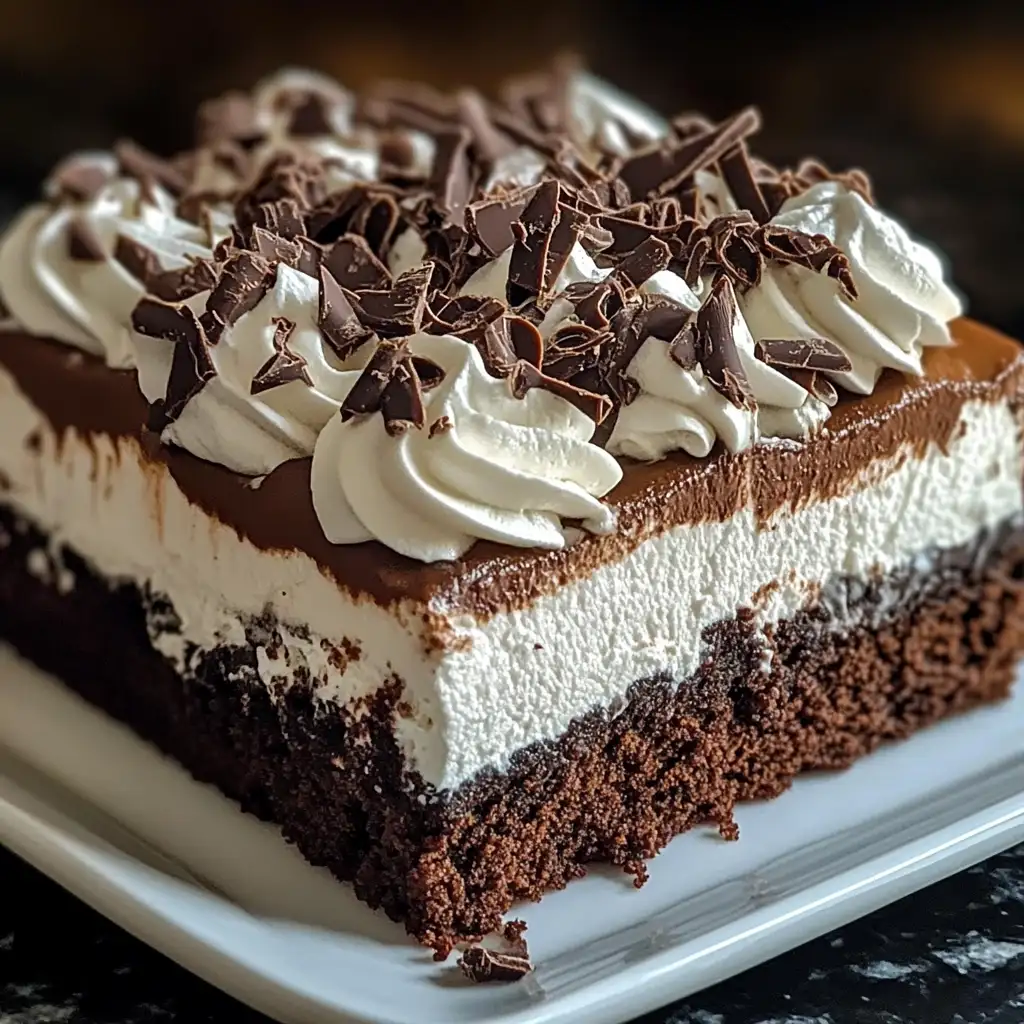
If you love rich, chocolatey desserts with creamy layers and minimal effort, this Brownie Refrigerator Cake is about to become your new favorite indulgence. It starts with a fudgy brownie base, then gets layered with sweet cream cheese, silky chocolate pudding, and a cloud of whipped topping. The best part? The refrigerator does most of the work. It’s cool, creamy, decadent, and perfect for potlucks, holidays, or anytime you’re craving a make-ahead dessert that tastes like a dream.
Ingredients:
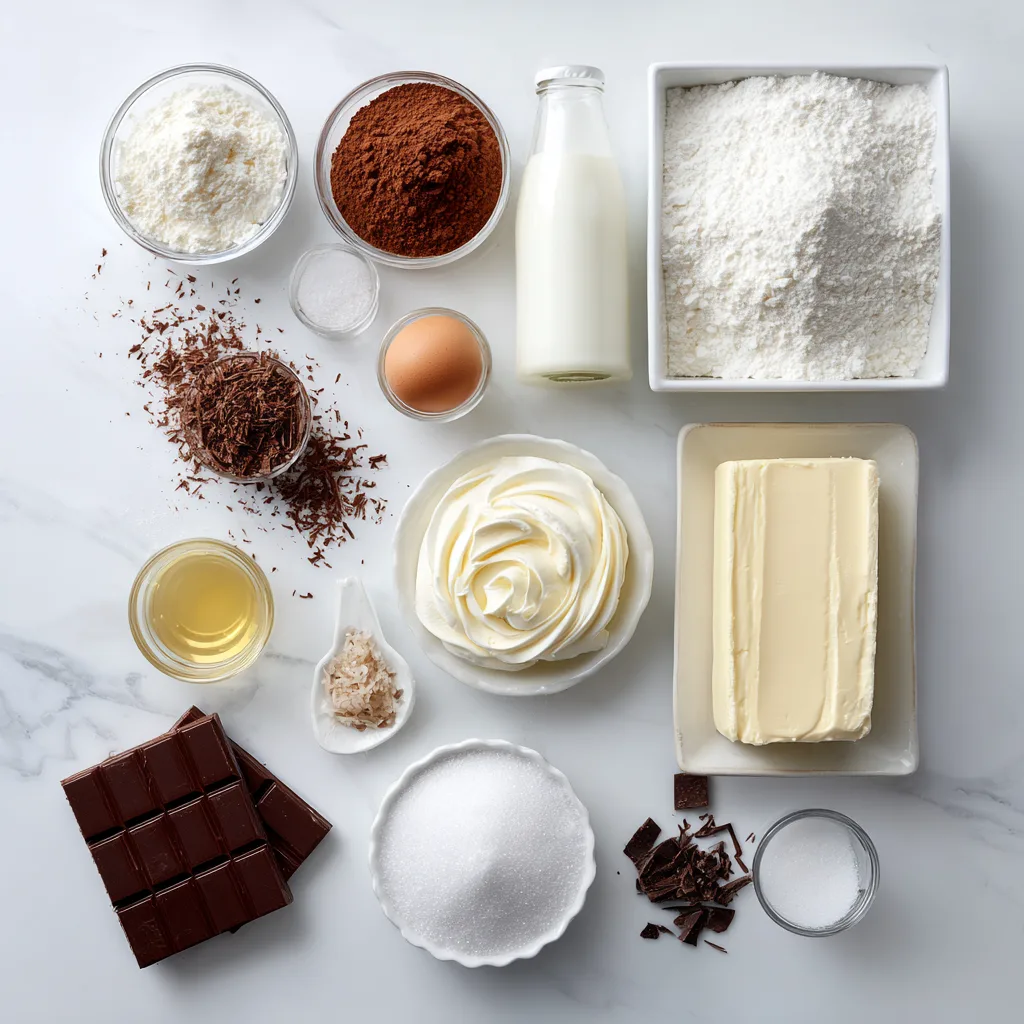
- 1 box brownie mix (plus ingredients required on the box)
- 1 package (8 oz) cream cheese, softened
- 1 cup powdered sugar
- 1 tub (8 oz) whipped topping, thawed and divided
- 2 boxes (3.9 oz each) chocolate instant pudding mix
- 3 cups cold milk
- Chocolate shavings or curls, for garnish
Instructions:
- Prepare the Brownie Layer:
Preheat the oven according to the brownie mix package directions. Prepare the batter as instructed and bake in a 9×13-inch pan. Once baked, allow the brownies to cool completely in the pan before adding any layers. - Make the Cream Cheese Layer:
In a medium bowl, beat the softened cream cheese and powdered sugar together until smooth and fluffy. Gently fold in half of the whipped topping until fully incorporated. Spread evenly over the cooled brownie layer. - Prepare the Chocolate Pudding Layer:
In a separate bowl, whisk together the instant chocolate pudding mixes and cold milk. Continue whisking until thickened. Spread the pudding evenly over the cream cheese layer. - Top and Chill:
Spread the remaining whipped topping over the pudding layer, smoothing it out evenly. Garnish with chocolate shavings or curls. Refrigerate for at least 4 hours, or overnight, until fully set before slicing and serving.
Variation
- Homemade Brownie Base
For an extra-rich and deeply chocolatey foundation, swap the boxed mix for your favorite homemade brownie recipe. A from-scratch brownie often has a denser texture and more intense cocoa flavor, which pairs beautifully with the creamy layers on top. - Add Crunch Between the Layers
Sprinkle crushed chocolate sandwich cookies, toffee bits, mini chocolate chips, or chopped nuts between the cream cheese and pudding layers. This adds texture and a pleasant crunch that contrasts perfectly with the smooth, creamy components. - Flavor Twist
Try using different pudding flavors like chocolate fudge, white chocolate, or even cheesecake-flavored pudding. You can also mix a tablespoon of espresso powder into the brownie batter to enhance the chocolate flavor without making it taste like coffee.
Cooking Notes
- Make sure the brownies are completely cooled before adding the cream cheese layer to prevent melting and sliding.
- Soften the cream cheese fully to avoid lumps in the filling.
- Allow enough chill time so the layers set properly and slice cleanly.
Serving Suggestions
- Serve Extra Chilled
For clean slices and defined layers, serve the cake well chilled. You can even refrigerate it overnight for the best texture and flavor development. - Dress It Up for Entertaining
Top each slice with additional chocolate curls, a drizzle of chocolate syrup, or a dusting of cocoa powder for an elegant presentation at gatherings. - Pair with Fresh Berries
Serve with fresh raspberries or strawberries on the side. The slight tartness balances the richness of the chocolate and cream layers beautifully.
Tips
- Use Cold Milk for Pudding
Cold milk helps the pudding set quickly and evenly, giving you a smooth, thick layer that spreads easily. - Spread Layers Gently
Use an offset spatula and spread each layer slowly to avoid mixing the layers together. - Slice with a Clean Knife
Wipe your knife clean between cuts for picture-perfect slices with distinct layers.
Prep Time:
- Prep Time: 20 minutes
- Cook Time: 20–25 minutes (for brownies)
- Total Time: 4 hours 20 minutes (including chilling time)
Nutritional Information (Per Slice)
- Calories: 350 kcal
- Protein: 5g
- Sodium: 320mg
Frequently Asked Questions
- Can I make this dessert ahead of time?
Yes! This dessert is perfect for making a day in advance. In fact, chilling overnight enhances the flavor and helps the layers set beautifully. - Can I freeze Brownie Refrigerator Cake?
You can freeze it for up to 1 month. Wrap tightly and thaw in the refrigerator before serving. Keep in mind the texture may be slightly softer after thawing. - Can I use homemade whipped cream instead of whipped topping?
Absolutely. Stabilized homemade whipped cream works best to maintain structure and prevent weeping. - How should I store leftovers?
Store covered in the refrigerator for up to 4 days. Keep it tightly sealed to maintain freshness and prevent it from absorbing other fridge odors.
Conclusion
This Brownie Refrigerator Cake is the ultimate layered dessert—rich, creamy, chocolatey, and incredibly easy to make. With its fudgy base and luscious no-bake layers, it’s a guaranteed crowd-pleaser that looks impressive but comes together with simple ingredients. Whether you’re preparing it for a special celebration or just a weekend treat, one slice is never enough.
Print
Brownie Refrigerator Cake
- Total Time: 4 hours 20 minutes
- Yield: 12 slices 1x
- Diet: Vegetarian
Description
If you love rich, chocolatey desserts with creamy layers and minimal effort, this Brownie Refrigerator Cake is about to become your new favorite indulgence. It starts with a fudgy brownie base, then gets layered with sweet cream cheese, silky chocolate pudding, and a cloud of whipped topping. The best part? The refrigerator does most of the work. It’s cool, creamy, decadent, and perfect for potlucks, holidays, or anytime you’re craving a make-ahead dessert that tastes like a dream.
Ingredients
- 1 box brownie mix (plus ingredients required on the box)
- 1 package (8 oz) cream cheese, softened
- 1 cup powdered sugar
- 1 tub (8 oz) whipped topping, thawed and divided
- 2 boxes (3.9 oz each) chocolate instant pudding mix
- 3 cups cold milk
- Chocolate shavings or curls, for garnish
Instructions
- Prepare the Brownie Layer:
Preheat the oven according to the brownie mix package directions. Prepare the batter as instructed and bake in a 9×13-inch pan. Once baked, allow the brownies to cool completely in the pan before adding any layers. - Make the Cream Cheese Layer:
In a medium bowl, beat the softened cream cheese and powdered sugar together until smooth and fluffy. Gently fold in half of the whipped topping until fully incorporated. Spread evenly over the cooled brownie layer. - Prepare the Chocolate Pudding Layer:
In a separate bowl, whisk together the instant chocolate pudding mixes and cold milk. Continue whisking until thickened. Spread the pudding evenly over the cream cheese layer. - Top and Chill:
Spread the remaining whipped topping over the pudding layer, smoothing it out evenly. Garnish with chocolate shavings or curls. Refrigerate for at least 4 hours, or overnight, until fully set before slicing and serving.
Notes
- Make sure the brownies are completely cooled before adding the cream cheese layer to prevent melting and sliding.
- Soften the cream cheese fully to avoid lumps in the filling.
- Allow enough chill time so the layers set properly and slice cleanly.
- Prep Time: 20 minutes
- Cook Time: 20–25 minutes
- Category: Dessert
- Method: Baked + No-Bake Assembly
- Cuisine: American
Nutrition
- Serving Size: 1 slice
- Calories: 350 kcal
- Sugar: 28g
- Sodium: 320mg
- Fat: 18g
- Saturated Fat: 10g
- Unsaturated Fat: 6g
- Trans Fat: 0g
- Carbohydrates: 42g
- Fiber: 2g
- Protein: 5g
- Cholesterol: 35mg
Keywords: brownie refrigerator cake, layered chocolate dessert, no bake brownie dessert, chocolate pudding cake